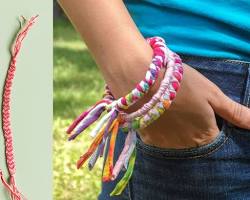
friendship bracelets have been a cherished symbol of friendship and self-expression for generations. These colorful woven bands are surprisingly easy to create, requiring just a few simple materials and a basic braiding technique. So, grab your embroidery floss and get ready to tie a friendship bracelet that you can share with a friend or wear with pride!
Materials Needed:
To embark on your friendship bracelet adventure, you'll need these essentials:

Embroidery floss (choose at least two contrasting colors for a classic look)
Scissors (to snip the floss)
Masking tape (to secure the floss while braiding)
Optional: Clip-on clasp (for easier wear)
Understanding Embroidery Floss
Embroidery floss is your secret weapon for creating vibrant and durable friendship bracelets. This type of thread comes in a vast array of colors, allowing you to unleash your creativity. Each skein of floss is made up of 6 individual strands. For thinner bracelets, you can use the entire skein (all 6 strands together). However, for a thicker and more substantial braid, you can separate the skein into 2 or 3 individual strands.
Choosing Your Design
The beauty of friendship bracelets lies in their customizable designs. You can find countless free friendship bracelet patterns online, ranging from simple stripes to intricate geometric shapes. For beginners, we recommend starting with a basic two-color pattern to get comfortable with the braiding technique. Once you gain confidence, you can graduate to more complex designs!
Preparing the Floss
Before you dive into braiding, let's get your floss prepped:
Cutting the Floss: Measure and cut a desired length of floss for each color you'll be using. A good starting point for bracelets is around 36 inches per color. Remember, it's always better to have more floss than you need, as you can always trim the excess later.
Separating the Strands (Optional): If you want a thicker braid, take each skein of floss and separate it gently into your desired number of strands (2 or 3). Remember, the more strands you use, the thicker your bracelet will be.
Securing the Floss for Braiding
Now that your floss is ready, it's time to create a secure starting point for braiding:
Take all the prepared floss strands (of both colors) and tie a simple knot at one end.
Fold the knotted end in half, creating a loop.
Using a piece of masking tape, securely attach the loop (where all the floss strands come together) to a flat surface like a table or clipboard. This will keep your floss from unraveling and make braiding easier.
Step-by-Step Braiding Guide
Here comes the fun part – braiding your friendship bracelet!
Dividing the Floss: Carefully separate the looped floss strands into two equal groups, with one group for each of your chosen colors. This will be the foundation of your braid.
Basic Braid Technique: Now, let's get braiding! Here's the core movement: take the outer strand from one group and pass it over the middle strand of that same group. This outer strand now becomes the new middle strand. Then, take the outer strand from the other group and do the same thing – pass it over the middle strand of its group and become the new middle strand there. Repeat this process – the outer strand over the middle strand, switching between the two groups – to continue braiding your bracelet.
Maintaining Tension: As you braid, gently but consistently pull on both ends of the floss to maintain an even tension. This will help create a neat and polished look for your bracelet.
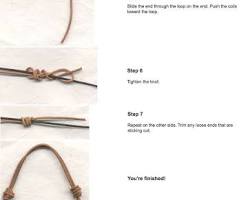
Finishing the Bracelet
Once your braid reaches its magic length, it's time to secure the ends and add some finishing touches:
Reaching Desired Length: Continue braiding until the bracelet reaches your desired length, plus an extra inch or so for tying the knot.
Tying a Square Knot: At each end of the braid, tie a secure square knot to prevent the bracelet from unraveling (refer to a previous article for detailed instructions on tying a square knot).
Trimming the Excess Floss: After tying the knots, use your scissors to trim any excess floss close to the knots.
Adding a Clasp (Optional)
While a square knot creates a secure closure, some people prefer the added convenience of a clasp. If you'd like to incorporate a clasp into your friendship bracelet design, you can use appropriate jewelry-making pliers to attach the clasp ends to the remaining floss tails after tying the knots. Here's a quick guide:
Opening the Clasp: Use your jewelry-making pliers to gently open the clasp's loop or hook.
Attaching the Floss: Slide the floss tails (one from each color) through the clasp's opening or onto the hook. Ensure the floss is securely held.
Closing the Clasp: Use your pliers to carefully close the clasp, ensuring the floss is firmly in place.
Adjusting the Clasp Position (Optional): If desired, you can gently slide the clasp along the bracelet to adjust its position.
Friendship bracelets are a delightful way to express your creativity, share a token of friendship, or simply add a pop of color to your style. Now that you know how to tie a friendship bracelet, you can embark on a journey of braiding, experimenting with different colors, patterns, and techniques to create personalized masterpieces. So, grab your floss, unleash your imagination, and start weaving your unique friendship bracelets!
Bonus Tip:
For easier beading and organization, especially when working with complex patterns, consider using masking tape or painter's tape to label the floss colors. This will help you keep track of which strand belongs to which color during the braiding process. Happy braiding!

Stiven is an experienced bracelet making expert with over 10 years of making experience. They have a deep knowledge of a variety of materials and techniques to create a variety of exquisite bracelets, from simple beaded bracelets to complex multi-strand braided bracelets.
This article was written by Stiven in combination with AI. The content described in this article is based on the author's personal opinions and data collection. If there are any errors or deficiencies, please correct me.