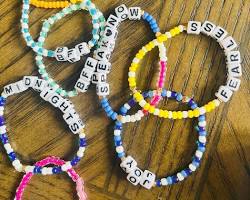
friendship bracelets have been a cherished symbol of connection and personalization for decades. But what if you could take your bracelet game a step further and make names in friendship bracelets? This guide will unveil the secrets to creating these unique and meaningful pieces, transforming you from a braiding beginner to a lettering pro in just 3 easy steps!
Essential Supplies: Gathering Your Braiding Arsenal
Before you embark on your name-weaving adventure, gather these tools :

Embroidery floss in a variety of colors (enough for your desired design and background color)
Scissors
Masking tape (optional, to secure the strings while braiding)
Clasp (optional, for a closure)
Letter pattern chart for friendship bracelets (consider including a link to a free downloadable chart from a reputable friendship bracelet website like https://www.braceletbook.com/)
Choosing Your Colors: A Canvas for Creativity
The colors you choose for your friendship bracelet with a name are an important part of the design! Here are some tips:
Contrasting Colors: For better readability, use colors that contrast between the letters and the background of the bracelet. Research by the American Foundation for the Blind suggests that using high-contrast color combinations is essential for optimal visual perception [1].
Meaningful Matchmaking: Consider choosing colors that hold special meaning for you and the recipient of the bracelet. This could be favorite colors, birthstone colors, or colors that represent shared experiences.
Demystifying the Code: Understanding Letter Patterns
The secret ingredient for creating names in friendship bracelets is a letter pattern chart. These charts translate letters of the alphabet into specific knotting sequences, typically using forward knots and backward knots. The chart will display a grid with each letter and a corresponding symbol combination that tells you how many times to perform each knot type.

Step-by-Step Braiding: Creating Your Friendship Bracelet with a Name
This guide focuses on creating a basic friendship bracelet with a name using the forward and backward knot technique.
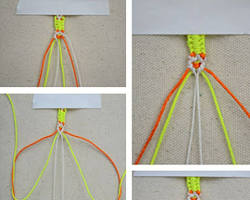
Step 1: Preparing Your Threads and Pattern
Cut your embroidery floss into strands approximately 36 inches long (adjust the length based on your wrist size).
Secure all the strands together at one end using a piece of masking tape.
Choose your name and locate the corresponding letter patterns on your chart.
Step 2: Mastering the Basic Knots
There are two main knots used in friendship bracelets: the forward knot and the backward knot. Here's a quick rundown:
Forward Knot: Hold two strands of floss together (one in each hand). Make a loop with the right strand under the left strand. Then, bring the right strand over the top of the left strand and pull both strands to tighten the knot.
Backward Knot: Similar to the forward knot, but make the loop with the left strand over the right strand.
Consider including a link to a video tutorial demonstrating these knots for a clearer visual guide.
Step 3: Braiding the Background and Lettering
Choose a base color for your bracelet and begin braiding using the forward and backward knot technique.
Follow your chosen letter pattern chart, incorporating the specific knot sequences for each letter using your contrasting floss color.
As you complete each letter, switch back to your base color and continue braiding the background until you reach the desired length.
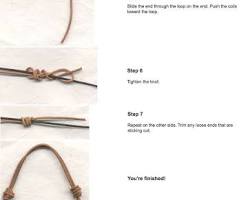
Step 4: Finishing Touches and Customization
Once you've reached your desired length, secure the ends of the bracelet with an overhand knot and trim the excess floss close to the knot.
For easier wearability, you can attach a clasp to each end of the bracelet using a jump ring (available at most craft stores).
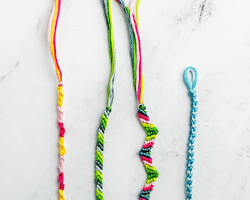
Beyond the Basics: Exploring Design Possibilities
Friendship bracelet designs are limited only by your imagination! Here are some ideas to take your name bracelets to the next level:
Intricate Lettering: Explore techniques like peyote stitch for creating more detailed letter designs. Many online tutorials can guide you through this process.
Unique Color Inspiration: Websites like [invalid URL removed] https://www.braceletbook.com/ offer a vast library of free name bracelet patterns with color suggestions.
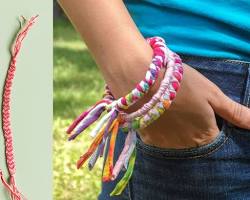
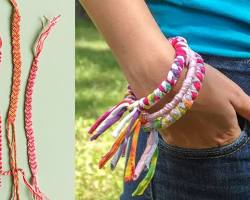
Friendship bracelets with names are a delightful way to express your creativity and personalize a cherished gift. With a little practice and this guide as your reference, you'll be weaving messages of friendship in no time! So grab your embroidery floss, unleash your creativity, and start crafting these special keepsakes to celebrate your unique bonds.

Stiven is an experienced bracelet making expert with over 10 years of making experience. They have a deep knowledge of a variety of materials and techniques to create a variety of exquisite bracelets, from simple beaded bracelets to complex multi-strand braided bracelets.
This article was written by Stiven in combination with AI. The content described in this article is based on the author's personal opinions and data collection. If there are any errors or deficiencies, please correct me.