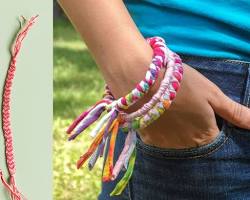
beaded friendship bracelets hold a special place in our hearts. These colorful, handcrafted tokens of friendship allow us to express creativity and celebrate our bonds with loved ones. But have you ever wondered how to make beaded friendship bracelets yourself? This guide will equip you with all the essentials to create your own unique bracelets, weaving threads of friendship and artistic expression together.
Essential Supplies
To embark on your friendship bracelet-making adventure, you'll need a few key items:
Embroidery floss in a variety of colors (pick colors that hold special meaning for you and your friend!)
Scissors
Beading needle (optional, but helpful for easier stringing)
Masking tape (optional, for securing the ends of the floss)
Ruler (optional, to measure bracelet length)
Clip (optional, to clasp the bracelet)
Choosing Your Design (Optional):
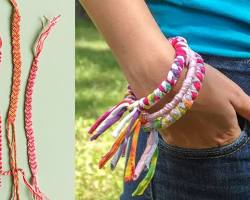
The beauty of friendship bracelets lies in their endless design possibilities. From classic stripes to intricate patterns with hearts or words, the sky's the limit! Online resources like graph paper or bracelet design software can help you create custom patterns.

Getting Started: The Basic Technique
Let's get your hands moving! Here's a breakdown of the essential steps:
Cutting the Floss: Begin by cutting several strands of embroidery floss to your desired length. Keep in mind that you'll need extra length for knotting and the final bracelet size. A good starting point is around 30-36 inches.
Securing the Floss (Optional): To prevent fraying, you can use masking tape to secure the ends of the floss strands before starting to knot.
Stringing the Beads (Optional): Feeling fancy? Friendship bracelets can be embellished with beads! Thread your chosen beads onto the floss using a beading needle (for smaller beads) or by hand (for larger beads).
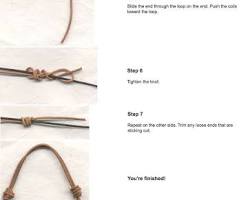
Creating the Friendship Knot
The foundation of your bracelet lies in the friendship knot. Here's how to master it:
Holding the Floss: Separate the floss strands into two equal groups and hold them taut. One group will be your working thread, and the other will be your base thread.
The Knotting Process: The basic friendship knot involves creating a simple loop with the working thread around the base thread, then pulling the working thread under the base thread and through the loop. Tighten gently to create a secure knot. Repeat this process on the other side, alternating sides with each knot. There are many visual aids and video tutorials online that can demonstrate this process in detail, making it easy to learn.
Building Your Design
Now comes the fun part – creating your design!
Following a Pattern (Optional): If you have a specific design in mind, follow a pre-made pattern. Many free friendship bracelet patterns can be found online, offering endless possibilities. These patterns will tell you the order in which to use different colored floss and when to incorporate beads.
Keeping Your Tension Even: As you knot, strive to maintain consistent tension on the floss. This will result in a neat and professional-looking bracelet. Don't worry, with a little practice, achieving even tension becomes second nature.
Finishing Touches
Almost there! Here's how to complete your masterpiece:
Tying the Ends: Once you've reached your desired length, tie a final knot at the end of the bracelet to secure it.
Adding a Clasp (Optional): For a user-friendly closure, you can attach a small clasp to the ends of the bracelet.
Sharing the Love!
Friendship bracelets are more than just accessories – they're symbols of connection. Gift your handmade creation to a friend, letting them know how much you cherish your bond. Seeing your creation worn with pride will surely bring a smile to your face.
Finding Inspiration and Exploring Techniques
The world of friendship bracelets is vast and exciting!
The Treasure Trove of Online Resources: The internet is brimming with online tutorials and design ideas for friendship bracelets. Explore different patterns, color combinations, and techniques to find inspiration for your next masterpiece.
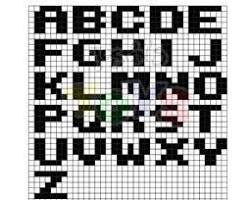
Beyond the Basics: As you gain confidence, venture into the world of advanced techniques like diagonal stitch patterns, chevron patterns, and even incorporating alphabet beads to spell out personalized messages for your friend.
Friendship bracelets are a rewarding way to express your creativity, celebrate friendship, and share something special with the people you care about. So grab your floss, get knotting, and weave your own story of friendship one colorful thread at a time!

Stiven is an experienced bracelet making expert with over 10 years of making experience. They have a deep knowledge of a variety of materials and techniques to create a variety of exquisite bracelets, from simple beaded bracelets to complex multi-strand braided bracelets.
This article was written by Stiven in combination with AI. The content described in this article is based on the author's personal opinions and data collection. If there are any errors or deficiencies, please correct me.