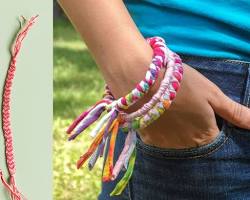
friendship bracelets – more than just colorful threads, they're tokens of camaraderie and a delightful way to express your creative side. But before you embark on braiding intricate patterns, mastering how to start a friendship bracelet is key! A secure starting knot lays the foundation for a neat and sturdy bracelet, ready to be gifted or proudly worn. So, grab your floss and follow these steps to get your friendship bracelet adventure underway!
Materials Needed:
Gather these essentials to bring your friendship bracelet dream to life:

Embroidery floss (various colors) in your desired lengths (around 36 inches per color is a good starting point for a standard bracelet)
Scissors (to cut the floss)
Masking tape or clipboard (to secure the starting point)
Optional: Beads (for embellishment)
Understanding the Design
The world of friendship bracelets is bursting with vibrant possibilities! From simple two-color designs to complex geometric patterns, there's a challenge for every skill level. Beginners can start with a basic square knot using just two colors of floss. As you gain confidence, explore the vast array of free friendship bracelet patterns available online for even more intricate designs.
Step-by-Step Guide: Starting a Friendship Bracelet
Now that you're prepped with your materials, let's begin!
Preparing the Floss: Measure and cut your desired lengths of floss in your chosen colors. Remember, you can always trim the excess later, but 36 inches per color is a good starting point for most wrist sizes.
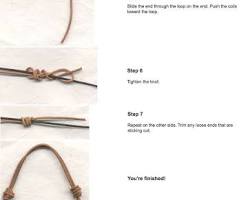
Securing the Starting Point:
Take all the floss colors and tie them together in a simple overhand knot. This creates a secure base for your bracelet.
Fold the knotted end in half, forming a loop.
Secure the loop to a flat surface like a table or clipboard using masking tape. This will keep your floss taut and organized as you braid.
Choosing Your Knot: Square Knot
The square knot is the hero of the friendship bracelet world! This fundamental knot forms the foundation of most braiding patterns. Here's a simplified explanation: imagine the floss strands are numbered 1 through 4 (from left to right). Take the strand numbered 1 (outermost strand) and pass it over strand number 2 (the middle strand). Strand number 1 will now become the new middle strand. Repeat this process on the other side – take strand number 3 (now the outermost strand) and pass it over strand number 4 (the new middle strand). Pulling the floss gently after each step will tighten the knot. Congratulations, you've just completed a square knot!
Starting the Braid
Friendship bracelet magic happens through a series of alternating square knots using different colored strands. For your first square knot, take the strand with the color you want at the beginning of your braid (let's call it color A) and follow the square knot steps mentioned earlier, using the other colored strands (B, C, etc.) as the middle and opposite strands. Tighten the knot gently.
Transitioning to Continuous Braiding
Now that you've completed your first square knot, you're ready to continue braiding! Repeat the square knot technique, alternating the colors used for the outer and middle strands. For example, if your first square knot used color A as the outer strand going over the middle, your next square knot might use color B as the outer strand going over the new middle strand (which might be color C). Maintaining a consistent, gentle tension on the floss as you braid will ensure a neat and even finished product.
Additional Tips (Optional)
For complex friendship bracelet patterns with multiple colors, consider using masking tape to label the different colored floss before you start braiding. This will help you keep track of which strand belongs to which color during the braiding process.
After tying your starting knot and securing it with tape, you can apply a tiny dab of clear nail polish to the knot for an extra layer of security (be sure to let the nail polish dry completely before starting to braid).
Mastering how to start a friendship bracelet is the first step on your creative braiding journey! With a secure starting knot and a basic understanding of the square knot, you're well on your way to crafting beautiful and personalized friendship bracelets. So, don't hesitate to experiment with different colors, patterns, and techniques as you develop your skills. Remember, the true spirit of friendship bracelets lies in the act of creation – and maybe even creating one with a friend!
Bonus Tip:
Friendship bracelets are all about celebrating friendship! Consider creating a bracelet with a friend, each using different colored floss. This way

Stiven is an experienced bracelet making expert with over 10 years of making experience. They have a deep knowledge of a variety of materials and techniques to create a variety of exquisite bracelets, from simple beaded bracelets to complex multi-strand braided bracelets.
This article was written by Stiven in combination with AI. The content described in this article is based on the author's personal opinions and data collection. If there are any errors or deficiencies, please correct me.