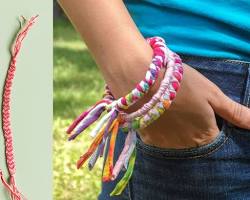
friendship bracelets have been a symbol of camaraderie and connection for generations. There's something truly special about gifting (or receiving!) a handmade bracelet woven with love and personalized with your chosen colors and patterns. Learning how to make a friendship bracelet is a fun and easy way to create a unique gift for a friend, all while strengthening the invisible thread that binds you.
Materials Needed:
Gather these few simple supplies to embark on your friendship bracelet adventure:

Embroidery floss (choose two or more colors that resonate with your friendship!)
Scissors (to snip the floss)
Masking tape (optional, to secure the floss ends)
Clip or safety pin (optional, to hold the floss taut while braiding)
Choosing Your Design
The beauty of friendship bracelets lies in their customizable designs. Patterns dictate the order in which you weave the different colored threads, creating stripes, geometric shapes, or even words and symbols. There are countless resources available online and in craft books to find easy beginner patterns. Don't be afraid to get creative! Choose colors that represent your friend's personality or a special memory you share.
Getting Started: The Basic Forward Knot
Before you begin weaving your masterpiece, let's prepare the floss. Cut your chosen embroidery floss strands to an appropriate length. A good rule of thumb is to triple the desired finished bracelet length and add a few extra inches for tying knots. Now, secure the ends of the floss together. Masking tape is a handy tool for this, but you can also use a knot or another method that works for you.
Now, let's learn the fundamental knot – the forward knot. This is the building block of your friendship bracelet. Hold the floss strands together, with one color in each hand. Make a "four" with the color in your right hand, reaching it under and around the other floss strand. Then, bring the end of the right floss strand up through the loop you just created, and pull both strands gently to tighten the knot. This is your first forward knot! Repeat this process, alternating the colors used for each knot, according to your chosen pattern.
Weaving the Bracelet
As you continue making forward knots, magic starts to happen! The knots interlock, creating the woven design of your friendship bracelet. It's important to maintain consistent tension on the floss as you weave. This will ensure your bracelet has a neat and even look. Keep following your chosen pattern, meticulously weaving the colors in the designated order.
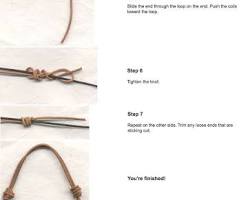
Finishing Touches
Once your bracelet reaches the desired length, it's time to secure the ends. Tie a square knot or another secure knot at the end of the woven braid. To create a loop closure, braid a short section using the remaining floss and then tie another knot to secure it. You can also get creative and add decorative elements like beads or charms to personalize your bracelet further (optional).
Tips and Troubleshooting
Here are some helpful tips for a smooth braiding experience:
Good Lighting is Key: Having good lighting can help you see the different floss colors clearly, especially if your pattern uses intricate details.
Take Breaks: Braiding for extended periods can cause hand strain. Take breaks to stretch your fingers and avoid discomfort.
Fixing Mistakes: Don't worry if you make a mistake! Carefully undo the last few knots and re-braid the section.
Creating a friendship bracelet is a rewarding experience. It allows you to express your creativity and weave a little piece of yourself into a meaningful gift for a friend. So grab your floss, choose your colors, and get ready to create a beautiful and personal token of friendship! With a little practice, you'll be braiding beautiful friendship bracelets in no time.
Bonus Tip:
For those who prefer a bit more structure while braiding, consider using a clipboard or a dedicated friendship bracelet loom. These tools help hold the floss taut and can make the weaving process even easier, especially for beginners.

Stiven is an experienced bracelet making expert with over 10 years of making experience. They have a deep knowledge of a variety of materials and techniques to create a variety of exquisite bracelets, from simple beaded bracelets to complex multi-strand braided bracelets.
This article was written by Stiven in combination with AI. The content described in this article is based on the author's personal opinions and data collection. If there are any errors or deficiencies, please correct me.