friendship bracelets are more than just colorful accessories – they're a symbol of the unbreakable bond between friends. These handmade bracelets have been a beloved tradition for generations, allowing people to express their creativity and affection through a simple yet meaningful craft.
Making friendship bracelets is not only a fun and inexpensive activity, but it's also a great way to strengthen relationships and create lasting memories. Whether you're looking for a relaxing hobby or a thoughtful gift idea, tying friendship bracelets is a rewarding experience that anyone can enjoy.
In this guide, we'll explore the art of friendship bracelet making, from choosing materials and mastering knot techniques to creating custom patterns and adding personal touches.
Before you begin, gather the following materials:
- Embroidery floss or cotton thread in your desired colors
- Scissors
- Tape or a clipboard (to secure the strands)
You can find embroidery floss at most craft stores or online retailers. Alternatively, you can use leftover thread or yarn from other projects. When choosing colors, consider your friend's favorite hues or create a meaningful color combination.
For patterns and designs, it's helpful to have a reference chart or image handy, or you can let your creativity guide you.
Setting Up
1. Measure and cut several strands of embroidery floss, making them at least twice the desired bracelet length.
2. Secure one end of the strands to a clipboard or flat surface using tape.
Basic Knot Techniques
The foundation of friendship bracelet making lies in two simple knots: the forward knot and the backward knot.
**Forward Knot**
1. Separate the strands into two groups.
2. Take the strand from the left group and form a loop towards you.
3. Pass the strand from the right group through the loop.
4. Pull both strands tight to secure the knot.
**Backward Knot**
1. Separate the strands into two groups.
2. Take the strand from the right group and form a loop away from you.
3. Pass the strand from the left group through the loop.
4. Pull both strands tight to secure the knot.
By alternating between forward and backward knots, you can create various patterns and designs.
Once you've mastered the basic knots, you can start experimenting with different patterns. Here are a few simple patterns to try:
**Striped Pattern**
1. Tie a forward knot with one color.
2. Tie a backward knot with a different color.
3. Repeat this sequence to create a striped pattern.
**Chevron Pattern**
1. Tie a forward knot with one color.
2. Tie a backward knot with the same color.
3. Tie a forward knot with a different color.
4. Tie a backward knot with the same color as the previous forward knot.
5. Repeat this sequence to create a chevron pattern.
You can also create custom patterns by alternating colors and knot directions in your desired sequence. Additionally, you can incorporate initials, symbols, or meaningful designs by carefully planning your knot placement.
To add an extra touch of personalization, you can incorporate beads or charms into your friendship bracelet design. Simply tie a knot, slide a bead onto the strands, and continue knotting as usual.
Beads and charms can represent special memories, initials, or meaningful symbols, making your friendship bracelet even more unique and sentimental.
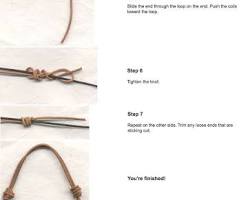
Once you've reached the desired length, it's time to secure the bracelet:
1. Tie a tight knot at the end of the strands.
2. Trim any excess string, leaving a small tail.
3. Apply a dab of glue or clear nail polish to the knot to prevent unraveling.
If you prefer a more polished look, you can add a clasp or adjustable closure to your friendship bracelet. Simply tie a loop at each end and attach the clasp or closure.
To ensure your friendship bracelet lasts, it's important to care for it properly:
- Avoid getting the bracelet wet, as moisture can cause the fibers to stretch or weaken over time.
- Store your bracelet in a cool, dry place, away from direct sunlight or heat.
- Gently clean the bracelet with a soft cloth or brush to remove any dirt or debris.
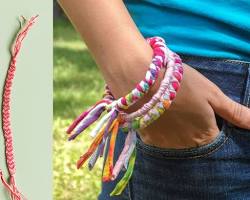
When wearing your friendship bracelet, consider pairing it with other bracelets or accessories for a trendy, layered look. You can also display your bracelet on a jewelry stand or hang it on a wall as a decorative piece.
Friendship bracelets have a rich cultural history and symbolism. In many cultures, these bracelets are exchanged as a token of friendship, love, and loyalty. The act of tying the bracelet is seen as a symbolic gesture of creating a bond that cannot be easily broken.
In some traditions, friendship bracelets are worn until they naturally fall off, signifying the enduring nature of the friendship. In others, the bracelet is cut off and the strands are tied together, representing the intertwining of two lives.
Regardless of the specific tradition, giving and receiving a friendship bracelet is a heartfelt way to celebrate the special connections in your life.
Tying friendship bracelets is a timeless and meaningful craft that brings people together. Not only is it a fun and creative activity, but it also allows you to express your affection and gratitude for the special friends in your life.
Whether you're making a bracelet for a best friend, family member, or yourself, the process of carefully knotting each strand is a meditative and rewarding experience. Don't be afraid to experiment with different colors, patterns, and embellishments to create a truly unique and personalized bracelet.
Share your creations with your loved ones, and encourage them to continue the tradition by making their friendship bracelets. Who knows, your handmade bracelet might become a cherished heirloom, passed down through generations as a symbol of the unbreakable bonds of friendship.
If you're looking to explore other bracelet styles or techniques, consider trying your hand at macramé, kumihimo, or beaded bracelets. The world of handmade jewelry is vast and full of possibilities, waiting for you to unleash your creativity.

Stiven is an experienced bracelet making expert with over 10 years of making experience. They have a deep knowledge of a variety of materials and techniques to create a variety of exquisite bracelets, from simple beaded bracelets to complex multi-strand braided bracelets.
This article was written by Stiven in combination with AI. The content described in this article is based on the author's personal opinions and data collection. If there are any errors or deficiencies, please correct me.