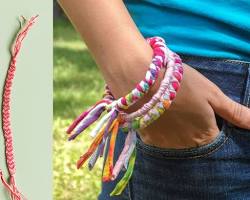
friendship bracelets are more than just colorful knotted strings - they're a timeless tradition of making meaningful keepsakes to cherish bonds with loved ones. The simple act of carefully crafting each knot into a unique pattern is a labor of love. Whether you're an experienced bracelet maker or a newcomer to this fun craft, making friendship bracelets allows you to create personalized gifts imbued with heartfelt sentiments.
To get started, you'll need embroidery floss or string, scissors, and patience! With some basic knot techniques and creative flair, you'll be on your way to making vibrant bracelets to gift friends, and family, and maybe even keep one for yourself.
The most common material for friendship bracelets is embroidery floss, which comes in a wide array of colors. Cotton embroidery floss is recommended as it's durable, knot-friendly, and has a nice sheen. You can use anywhere from 2 to 8 strings, but 4-6 is typical for most patterns.
In addition to the classic embroidery floss, you can experiment with other string types like hemp, leather, or even glow-in-the-dark strings. Beads and charms can add delightful embellishments too. Gather your preferred colors and materials before getting started.
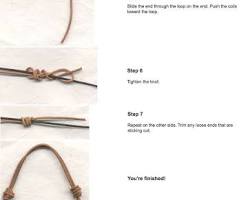
Begin by cutting 6-8 strings of embroidery floss, each about 2 arm-lengths long. Tie a simple knot at one end to bind the strings together. Then tie this knotted end tightly to something sturdy like a clipboard, tabletop edge, or even around your hand knuckles.
The two fundamental knots you'll use are the forward knot and the backward knot. For a forward knot, use your fingers to make a "4" shape with the string on the far left. Loop the next string counterclockwise through the "4" and pull tight. For a backward knot, make a reverse "4" shape and loop the next string clockwise through it.
1. Basic Patterns
One of the easiest patterns is the chevron or zigzag, made by alternating forward and backward knots. The striped pattern features blocks of the same color separated by a contrasting color. For the candy stripe, tie one forward knot, then one backward knot with the same color string.
2. Intermediate Patterns
The diagonal stripe has an eye-catching crisscross look achieved by tying one forward knot, moving to the next string, tying one backward knot, and so on. The arrow pattern uses groups of knots to create arrow shapes pointing in alternating directions. For diamonds, tie a chevron pattern, then reverse the knot direction to form diamond outlines.
3. Advanced Patterns
Get creative with alpha patterns spelling out names, words, or initials. You can incorporate beads or charms into patterns too by simply knotting before and after adding them. Braided patterns make thicker, more textured bracelets by separating the strings into two bundles and knotting them together.
4. Finishing Touches
Once your bracelet reaches the desired length, knot off the strings by making two knots one after the other. Apply fabric glue or clear nail polish to secure the knots. You can leave the bracelet as-is or attach a clasp or loop for an adjustable fit.
Personalize your creation by weaving meaningful symbols, initials, or color patterns. Get inspired by representing birthdays, zodiac signs, or inside jokes. The possibilities are limitless!
There's something extraordinarily special about receiving a handmade friendship bracelet. Surprise loved ones by adorning presents with a matching bracelet. Make yearly bracelets to celebrate friendiversaries. Or start a tradition of an annual friendship bracelet-making party!
To keep your bracelets vivid and intact, avoid getting them wet, and be gentle when putting them on and taking them off. With proper care, these tokens of friendship can be cherished for years or even generations to come.
Making friendship bracelets is an easy, inexpensive craft that allows you to create long-lasting symbols of love and appreciation. Once you master the basic knots, have fun experimenting with different patterns, materials, and personal touches. The next time you're looking for a heartfelt gift or bonding activity, grab some embroidery floss and start knotting away memories that will be forever tied to your dearest friendships.

Stiven is an experienced bracelet making expert with over 10 years of making experience. They have a deep knowledge of a variety of materials and techniques to create a variety of exquisite bracelets, from simple beaded bracelets to complex multi-strand braided bracelets.
This article was written by Stiven in combination with AI. The content described in this article is based on the author's personal opinions and data collection. If there are any errors or deficiencies, please correct me.