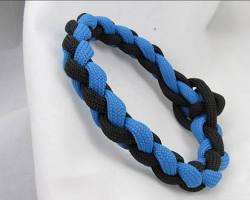
Materials Needed
Gather your supplies to embark on your paracord bracelet-weaving adventure:
Paracord (around 5-6 feet in length, choose your desired color(s))
Scissors
Lighter (optional, to seal the ends)
Buckle or clasp (optional)
Measuring tape (optional)
Choosing Your Design (Optional)
The world of paracord bracelets offers a vast array of designs, from simple braids to complex patterns. This guide will focus on creating a fundamental braid, a great starting point for beginners. As you gain confidence, explore the multitude of advanced designs available online!

Preparing the Paracord
Before diving into the weaving, let's get your paracord ready:
Cut the Cord: Using scissors, cut your paracord to a desired length. A general recommendation is 5-6 feet, but you can adjust this based on your wrist size and preferred bracelet length.
Melting the Ends (Optional): For a clean finish that prevents fraying, you can carefully melt the ends of the paracord using a lighter. Hold the flame slightly away from the cord ends and melt just enough to seal them.

Weaving the Basic Braid
Now comes the fun part – weaving the braid! Follow these steps with the corresponding image for a clear understanding:
Create a Loop: Fold the paracord in half, forming a loop at one end.
Attach to Anchor Point: Find a secure anchor point, like a doorknob or a sturdy table leg. Secure the loop of the paracord around this anchor point.
Separate the Cords: Separate the paracord into two individual cords. These will be your working cords.
Begin Weaving: Using one working cord, take it under the other cord and then up through the loop at the top. This creates the first knot of the braid.

Repeat the Weave: Continuously repeat step 4. Take the same working cord, under the other cord and up through the loop. Then, switch and repeat the same steps with the other working cord. This repetitive motion builds the basic braid pattern.
Maintain Tension: As you weave, gently pull on both working cords to maintain consistent tension in the braid.
Finishing the Bracelet
Once your braid reaches its peak, it's time to finish the bracelet:
Reach Desired Length: Continue weaving until the braid reaches your desired bracelet length.
Secure the Ends: Once you reach the desired length, thread the ends of the paracord through the last loop of the braid a few times for a secure hold.
Cutting and Sealing (Optional): If needed, cut off any excess cord and carefully melt the ends with a lighter (optional step).
Adding a Clasp (Optional): If you're using a clasp, thread the ends of the paracord through the clasp and secure it according to the clasp type.

Customization and Tips
Feeling creative? Here are some ways to personalize your bracelet:
Multiple Colors: Incorporate two or more paracord colors to create a patterned braid.
Bracelet Length: Adjust the length of the paracord based on your desired bracelet size.
Here are some additional tips to enhance your paracord bracelet experience:
Practice Makes Perfect: Don't get discouraged if your first attempt isn't flawless. With practice, your weaving skills will improve!
Watch Tutorials (Optional): For a more visual explanation, consider watching online tutorials on paracord bracelet weaving (optional).
Now that you've mastered the basic braid, you're well on your way to becoming a paracord weaving pro! This guide has equipped you with the knowledge to prepare the materials, weave the braid, finish the bracelet, and explore customization options. So unleash your creativity, weave unique paracord bracelets, and don your skills with pride! We'd love to see your paracord bracelet creations – feel free to share pictures of your finished bracelets online!
This article was written by Stiven in combination with AI. The content described in this article is based on the author's personal opinions and data collection. If there are any errors or deficiencies, please correct me.