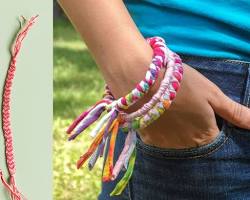
friendship bracelets, those colorful woven threads exchanged between friends, have held a special place in our hearts for generations. But beyond the traditional straight-line patterns, there's a world of vibrant possibilities waiting to be explored – enter the chevron friendship bracelet! With its diagonal rows of color creating a delightful zig-zag effect, a chevron bracelet is a fun and eye-catching way to express your creative spirit.
Gathering the Supplies for Your Masterpiece:
Creating a chevron friendship bracelet requires just a few simple materials:

Embroidery Floss: This is your go-to thread for friendship bracelets. Choose vibrant colors that contrast well for a clear chevron pattern. Bold purples and yellows, or playful pinks and blues – the color combinations are endless!
Scissors: To snip your floss to the perfect length.
Tape (Optional): For securing the threads if you don't have another option.
Clipboard or Cardboard (Optional): A flat surface to secure your threads while you work.
Understanding the Chevron Magic:
The secret to a beautiful chevron pattern lies in its diagonal rows of color. By alternating the colors strategically, you create a zig-zag effect that adds a touch of dynamism to your bracelet. Choosing contrasting colors will make the pattern pop, so don't be afraid to experiment!
Preparing Your Threads: Getting Ready to Weave
Before you embark on your weaving journey, let's get your threads prepped:
Cutting the Floss: The length of floss you need depends on your desired bracelet size. A good rule of thumb is to cut six equal strands three times the length of your finished bracelet. This allows for plenty of room for weaving and tying knots.
Separating the Strands (Optional): If you're using multi-stranded embroidery floss, gently separate the individual strands for easier weaving.
Securing the Threads: There are two ways to secure your threads for weaving. You can tie a simple knot at the end of all six strands, or, for a more stable starting point, tape them to a flat surface like a clipboard or a piece of cardboard.
Weaving the Chevron Pattern: Row by Row
Now comes the fun part – weaving the chevron pattern! Here's a step-by-step guide:
Holding the Threads: The key to creating those diagonal rows lies in how you hold the threads. Use your thumb and pointer finger of each hand to hold three threads each. The order matters! Arrange the threads so that the colors you want to appear on the right side of your bracelet are held in your right hand, and the colors for the left side are held in your left hand.
Tying the First Row: We'll start with a basic forward knot. Take the two outer threads from your right hand (the colors that will be on the right side of your bracelet) and tie them over the center three threads (held in your left hand). Repeat this process on the other side, using the two outer threads from your left hand to tie a knot over the center three threads held in your right hand. This completes your first diagonal row.
Continuing the Pattern: The magic of the chevron pattern unfolds as you switch the outer threads to the center position for each new row. After completing the first row, take the two threads that were previously on the outside (now the center threads in your right hand) and move them to the outside of your left hand. Do the same with the two threads that were originally on the outside in your left hand, moving them to the center position in your right hand. Now, repeat step 2, tying another forward knot over the new center threads. Maintain this process of switching outer threads to the center and tying knots to create a continuous chevron pattern.
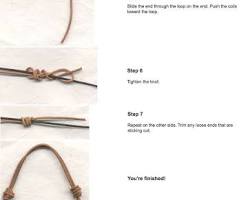
Finishing Touches: Securing Your Creation
Once your bracelet reaches your desired length, it's time to secure it:
Ending the Bracelet: Tie a final knot using the same forward knot technique. Leave enough thread at the end to create a loop for fastening the bracelet.
Braiding the Ends (Optional): For a polished look, braid the excess thread at the end of your bracelet. You can braid all six strands together, or separate them into two smaller braids for a more detailed finish.
Beyond the Basics: Experimentation Awaits!
Chevron friendship bracelets are a fantastic foundation for exploration! Here are some ways to take your creations to the next level:
Using More Colors: Feeling bold? Don't limit yourself to two colors! Experiment with using more than two colors for a more complex and vibrant chevron pattern.
Exploring Different Knots:
The forward knot is a great starting point, but don't be afraid to experiment with different knotting techniques to add texture and variation to your chevron bracelet. You can try using a double forward knot, a backward knot, or even a combination of different knots. There are countless tutorials available online to guide you through various knotting techniques.
Conclusion: A Canvas for Creativity
Creating chevron friendship bracelets is a fun, rewarding, and expressive craft. With its vibrant colors, eye-catching pattern, and endless possibilities for variation, a chevron bracelet is a unique and personalized way to showcase your creativity. So gather your embroidery floss, scissors, and a touch of imagination, and let the chevron weaving adventure begin!

Stiven is an experienced bracelet making expert with over 10 years of making experience. They have a deep knowledge of a variety of materials and techniques to create a variety of exquisite bracelets, from simple beaded bracelets to complex multi-strand braided bracelets.
This article was written by Stiven in combination with AI. The content described in this article is based on the author's personal opinions and data collection. If there are any errors or deficiencies, please correct me.