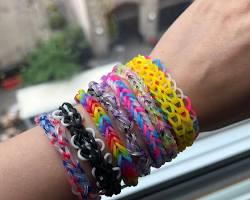
Ever wondered how to make a rubber band bracelet step by step? These colorful creations are more than just a fun accessory; they're a creative outlet and a perfect way to express your unique style. This guide will unveil the magic of rubber band bracelets in 3 easy methods, transforming you from a curious beginner into a braiding extraordinaire!
Description: Learn how to create your own custom rubber band bracelets using two popular methods: with a loom or using just your fingers. This guide includes step-by-step instructions, troubleshooting tips, and creative ideas to take your bracelet designs to the next level.
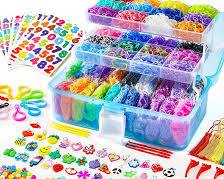
Essential Supplies: Gathering Your Braiding Arsenal
Before you embark on your rubber band braiding adventure, gather these tools :

Rubber bands in a variety of colors (enough for your desired design)
Rainbow loom (optional, but recommended for beginners) or your fingers
Hook tool (if using a loom)
Clip (optional, to secure the bracelet while braiding)
Loom or No Loom? Choosing Your Braiding Method
The world of rubber band bracelets offers two main braiding methods: using a loom or using your fingers only.
Loom Method: Looms provide a stable platform for braiding, making them ideal for beginners. Looms also allow for creating more complex designs with multiple rows.
Finger Method: The finger method is a great option for creating simple bracelets on the go. This method requires no additional tools, making it perfect for quick and easy braiding sessions.

Step-by-Step Braiding: Creating a Basic Single chain bracelet
The single-chain bracelet is the foundation for many rubber band designs. Here's how to create one using both methods:
Loom Method:
Follow the instructions included with your loom to set it up correctly.
Using the hook tool, loop a rubber band around the center post from the bottom up.
Repeat step 2, adding another rubber band on top of the first one. You'll now have two loops on the center post.
Using the hook tool, grab the bottom loop (the older band) and lift it over the top loop (the newer band). Hook the bottom loop onto the next peg to the right.
Repeat steps 2-4, adding new bands and looping them onto the center post before hooking the bottom loop over the top loop and onto the next peg. This creates the single chain pattern.
Finger Method:
Wrap a rubber band around two or three fingers (depending on your preference for bracelet width).
Twist the bottom half of the band upwards to create a figure-eight shape on your fingers.
Take another rubber band and loop it around your fingers on top of the twisted band. Do not twist this new band.
Using your thumb and index finger, reach down and grab the bottom loop (the twisted band). Lift it up and over the top loop (the untwisted band). Pull the bottom loop off your fingers and loop it around the middle band (the twisted band).
Repeat steps 3-4, adding new bands and looping them as described to create the single chain pattern.
Customizing Your Creation: Exploring Colors, Patterns, and Beyond
The possibilities for personalizing your rubber band bracelets are endless!
Color Play: Experiment with different color combinations to create solid colors, stripes, geometric patterns, or even words. You can use online resources to find inspiration for color-coded designs.
Double Up: For a thicker and sturdier bracelet, use two rubber bands at a time while braiding.
Braiding Bonanza: Exploring Techniques Beyond the Basics
As you gain confidence, explore different braiding techniques beyond the single chain. Here are a few popular options to get you started:
Fishtail Braid: This technique creates a zig-zag pattern that resembles a fishtail.
Starburst Braid: This technique creates a star-like pattern in the center of the bracelet.
Rainbow Loom Variations: Rainbow looms offer a wider variety of pegs and configurations, allowing for even more intricate designs. Explore online tutorials for specific rainbow loom braiding techniques.
Troubleshooting Tips: Fixing Mistakes and Band Breakage
Don't worry, mistakes happen! Here's how to address them:
Fixing Mistakes: If you accidentally loop a band incorrectly, simply use the hook tool (or your fingers) to carefully remove the band and re-loop it correctly. If you're using a loom, you can use the hook tool to lift the bottom loop over the top loop and onto the previous peg. If you're braiding with your fingers, you can simply undo the last few loops and re-do them correctly.
Broken Bands: Rubber bands can break during braiding. If this happens, simply replace the broken band with a new one and continue braiding. If you're using a loom, you can use the hook tool to carefully remove the broken band from the pegs and replace it with a new one. If you're braiding with your fingers, you can simply undo the last few loops until you reach the broken band, remove it, and replace it with a new one.
Rubber band bracelets are a fun, creative, and affordable way to express your style. With a little practice and this guide, you'll be braiding like a pro in no time! So grab your rubber bands, your loom (or your fingers), and get started! Don't be afraid to experiment with different colors, patterns, and braiding techniques to create unique and eye-catching bracelets. And remember, if you make a mistake, don't worry! Just take a deep breath and fix it. With a little patience and perseverance, you'll be creating rubber band masterpieces in no time.
Additional Tips and Ideas
Use high-quality rubber bands: Cheap rubber bands can break easily, making it difficult to braid with them. Invest in a pack of high-quality rubber bands to ensure a smoother and more enjoyable braiding experience.
Keep your workspace organized: As you braid, your workspace can quickly become cluttered with rubber bands and tools. Keep a small container or tray nearby to store extra bands and tools, keeping your workspace tidy and preventing lost items.
Seek inspiration online: There are countless resources available online for inspiration and tutorials on rubber band bracelet designs. Browse websites, watch videos, and follow social media accounts dedicated to rubber band bracelet creations to discover new ideas and techniques.
Share your creations with others: Once you've mastered the basics, share your rubber band bracelet creations with friends, family, and online communities. You can even make them as gifts or sell them at craft fairs or online marketplaces.
With a little creativity and these tips, you'll be well on your way to becoming a rubber band bracelet expert!

Stiven is an experienced bracelet making expert with over 10 years of making experience. They have a deep knowledge of a variety of materials and techniques to create a variety of exquisite bracelets, from simple beaded bracelets to complex multi-strand braided bracelets.
This article was written by Stiven in combination with AI. The content described in this article is based on the author's personal opinions and data collection. If there are any errors or deficiencies, please correct me.