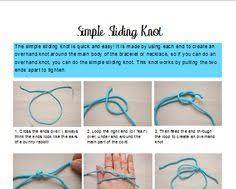
sliding knot bracelets have become a popular choice for their versatility and convenience. They offer a clean, clasp-free design and the ability to adjust the fit for ultimate comfort. However, the sliding knot itself can sometimes pose a challenge for beginners. Fear not! With a few simple steps, you'll be tying beautiful sliding knots and creating stunning bracelets in no time.
Understanding the Benefits of a Sliding Knot
The beauty of a sliding knot lies in its functionality. Here's why you might choose this knot for your next bracelet creation:
Adjustable Comfort: The sliding knot allows the wearer to easily adjust the bracelet size for a perfect fit. No more struggling with clasps that are too tight or too loose!
Clasp-Free Design: Sliding knots eliminate the need for a separate clasp, resulting in a cleaner and more streamlined look for your bracelet.
Materials Needed
The good news is that you can create a sliding knot bracelet using a variety of materials:
Cord (cotton cord is a good choice for beginners due to its texture)
String
Yarn
Choose a material with a bit of texture, as this can make manipulating the knot a little easier. Make sure to cut your cord to a desired length, keeping in mind extra length for knotting and potential size adjustment.

Tying the Sliding Knot (Step-by-Step Guide)
Now, let's get down to the fun part – tying the knot!
Preparing the Cord: Cut your cord to your desired length, remembering to leave some extra room for the knot and potential size adjustments.
Creating the Loop: At one end of the cord, form a loop. The size of the loop will determine the size of the opening in your finished bracelet.
The Wrapping Magic: Here comes the knot! Take the working end of the cord (the end that isn't looped) and wrap it around the main cord a specific number of times. The number of wraps will depend on the desired size and security of your knot. Three to five wraps is a good starting point.
Securing the Knot: With your working end still in hand, thread it through all the loops you just created around the main cord. Gently pull on the working end to tighten the knot securely. Don't worry if it feels a little loose at first – that's normal.
Adjusting the Bracelet and Finishing Touches
Now that your knot is tied, the fun of customizing your bracelet begins!
Adjusting the Size: Pull on the two cord ends to adjust the size of the bracelet. The sliding knot will move freely, allowing you to find the perfect fit.
Adding Embellishments (Optional): Before tying the final knot at the other end of the cord, you can unleash your creativity. Slide on beads, charms, or other embellishments to personalize your bracelet.
Troubleshooting Tips
Don't be discouraged if your knot isn't perfect on the first try. Here are a few troubleshooting tips:
Knot Won't Tighten: If your knot feels loose after pulling the working end, don't worry! Gently squeeze the knot while pulling on the working end to tighten it further.
Starting Over: The beauty of knots is that you can always untie and try again. If your knot doesn't form correctly, simply loosen it and follow the steps above.
With a little practice, tying a sliding knot bracelet will become second nature. This handy skill allows you to create beautiful, adjustable bracelets that are perfect for any occasion. So, grab your cord, unleash your creativity, and get ready to master the art of the sliding knot!
This article was written by Stiven in combination with AI. The content described in this article is based on the author's personal opinions and data collection. If there are any errors or deficiencies, please correct me.