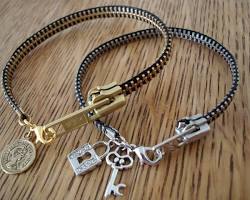
zipper bracelets are a fun and trendy accessory that's surprisingly easy to make yourself! How do you make a zipper bracelet? This guide will walk you through the process step-by-step, making it perfect for beginners. Get ready to unleash your creativity and craft a one-of-a-kind zipper bracelet to add a pop of personality to your wardrobe!
Materials on Deck: Gathering Your Supplies
To create your zipper bracelet, you'll need a few simple things:
A zipper: The length will determine your bracelet size. A 7-8 inch zipper is a good starting point, but feel free to experiment!
Scissors
A jewelry clasp (optional, for a more secure closure)
Pliers (optional, if using a clasp)
Ribbon or string (optional, for adding a decorative touch)
Zippers come in a variety of colors and patterns, so don't be afraid to pick one that reflects your style. For a classic look, a black or silver zipper works well, while a bright or patterned zipper can add a playful touch.

Prepping the Zipper: Cutting and Unraveling
The first step is to transform your zipper into the base for your bracelet. We'll be separating the two sides of the zipper to create the braiding material. Using your scissors, carefully cut along the closed seam of the zipper. Stop about a half-inch from the zipper ends to ensure you have enough material for braiding and attaching a clasp (if using). Once you've cut the seam, unzip the zipper completely.

Wrapping It Up: The Braiding Process
There are two common braiding techniques for zipper bracelets: single wrap and double wrap. Both methods are easy to learn and create slightly different looks.
Single Wrap: Begin at one end of the zipper. Wrap the zipper around your wrist, then fold it back over itself. Continue wrapping the zipper around your wrist and folding it back until you reach your desired bracelet length.
Double Wrap: This method is similar to single wrap but with a little more volume. As you wrap the zipper around your wrist, do it twice before folding it back over itself. This creates a thicker, more textured braid.
V. Finishing Touches: Adding a Clasp and Decoration (Optional)
A clasp isn't strictly necessary, but it does make your bracelet easier to put on and take off. If you'd like to add a clasp, you'll need some pliers (optional). Open a jump ring on the clasp using the pliers and attach it to one end of the zipper braid.
Feeling creative? This is where you can personalize your bracelet further! Thread some ribbon or string through the other end of the zipper braid and tie it in a bow for a decorative loop. You can also braid the excess zipper material or add beads or charms for an extra touch of flair.
VI. Show It Off! Rocking Your Zipper Bracelet
Now that your masterpiece is complete, it's time to show it off! Zipper bracelets are a great conversation starter and add a unique touch to any outfit. Wear yours with pride and enjoy the compliments!
VII. Beyond the Basics: Exploring Variations
The beauty of zipper bracelets is their versatility. The basic design we covered here is just the beginning! Explore online tutorials for more intricate braiding techniques, like diagonal or herringbone braids. You can even get adventurous and use multiple zippers of different colors or textures to create a truly bold statement piece.
VIII. Conclusion
Creating your zipper bracelet is a fun and rewarding experience. It's a great way to express your creativity and personalize your accessories. So, grab your supplies, get zipping, and don't be afraid to experiment with different designs!
IX. Call to Action
We'd love to see your zipper bracelet creations! Share a picture of your finished product online using the hashtag #ZipperBraceletLove.
This article was written by Stiven in combination with AI. The content described in this article is based on the author's personal opinions and data collection. If there are any errors or deficiencies, please correct me.